From finding out what shade of foundation suits you the best to learn how to use different shades to enhance your natural beauty, playing around with makeup can be fun once you know the basics of makeup application. You can even give yourself a painless facelift if you are talented enough in the skill! While contouring is a skill worth having, it pays more to know how to apply eye makeup perfectly.
If you want to apply makeup the right way, it takes more than just picking out products and putting them on your face. Makeup is an art form, just like painting or sculpting, and it requires a certain level of knowledge about colors, what goes well together, what products to use, and how to use the proper makeup equipment to get a flawless finish.
How to Apply Eye Makeup Perfectly
Trying to perfect your eye makeup routine can be daunting, but once you get the hang of it you’ll be able to create any look you want! Here are some tips and tricks to get you started: -When applying primer, make sure to focus on the areas where you usually have the most trouble with your makeup (e.g. oily lids, dryness, etc.). -Be careful not to use too much product when applying shadow – a little goes a long way! -When applying liner, start from the inner corner of your eye and work your way out. -And finally, when applying mascara, make sure to apply it to both your top and bottom lashes for a more natural lookHaving the right tools to work with is important for any venture. Without the right sponges and brush, your makeup will not come out looking as flawless and you would like it to.
The basic brushes that you will need in your eye makeup kit are a soft and fluffy blending brush, a flatter, smaller brush to lay down your eye shadow colors with, an angled brush for lining, a pencil brush for detailing and getting into the little corners, and a smudge brush.
2. Gather the Right Products
Picking the right products is just as important as getting the right tools. When it comes to eye makeup, you will need a concealer, eye shadow kit, eyeliner, and mascara. If you like a more dramatic look, you can also invest in false lashes. When choosing an eye shadow kit, make sure it has at least three shades of one color. This will help create more depth to your eye makeup and avoid a two-dimensional look.
3. Prime Your Lids
Art always looks best when starting with a blank canvas, and it is no different with makeup. Priming the eyelids and getting them ready for the colors is an important step. There are eyeshadow base primers in the market, but your normal concealer works just as well!
Applying a base will make sure that you have a canvas that will make your eyeshadow pop. Make sure that you dab the concealer, and do not rub it into the skin. You can use your blending brush to blend out the product so that there is no harsh line where the concealer ends.
4. All About the Base
Dip the blending brush into the lightest of the three shades you have chosen to use. This will be the base color of your makeup. You can always use a natural taupe shade as a base for almost any look.
Tap your brush on the side of the makeup palette to remove the excess powder. Gently sweep this shade across your eyelids. For drama, buffer the color all the way to your brow bone.
5. Blend
Blending is a simple technique that can make or break your entire makeup. If you have ever seen eye makeup that looked harsh and untidy, it is most likely because it was not blended well. Blending your eyeshadow will ensure the colors you put down look softer and more natural, blending into each other to create a gradient effect.
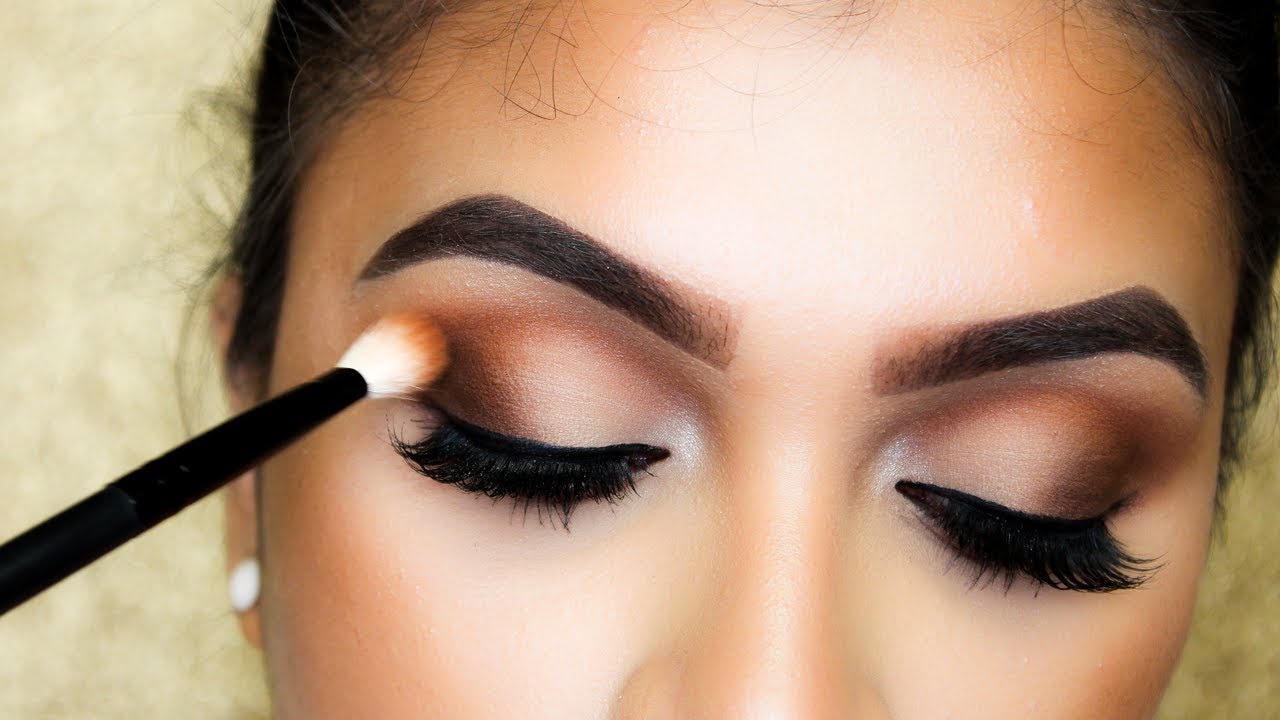
6. Add Definition to the Crease
Adding a bit of definition to your crease will open up your eyes, making them look bigger. Dip the flat brush into the medium shade that you picked out. Now, apply this to the crease, which is the part where your eyelid and brow bone meet. For an everyday look, do not blend this color higher than the crease of your eyelids.
For hooded eyes, you will need to do your eyeshadow differently. Keep your eyes open during this step, and blend the medium shade in to stop just above the crease. When those with hooded eyes have their eyes open, any shadow applied on the lid’s center will no longer be visible. By placing the medium shade above the crease instead of into the crease, the color will be higher and visible even when the eyes are open. This technique is like creating a false crease above the natural one to give your eyes a lift, making your eyes look bigger. Also, it will create more lid space for you to work on. Blend this shade out until you cannot make out where the medium shade ends and the light shade begins. If you end up blending too much and the color fades, don’t worry! Just pick up some more color and blend it in.
7. Define Eye Shape
Dip your angled brush into the darkest shade of eyeshadow that you picked out. Tap off the excess and then use the angled brush to make a V-shape, extending from the upper lash line to the outer crease. Remember not to make the line too dark since it’s always easier to add more color if needed than it is to remove color if it turns out too dark. If you’re having trouble getting the angle right, try holding up a pencil or placing a piece of tape near your hand to act as a guide. For this, you’ll want to place the pencil or tape from the outer corner of your eye to the tapered end of your eyebrow.
8. Color Lower Lid
Using the small flat brush, pick up the medium shade and color in your lower lid. Stay as close to your lash line as possible. Blend this out with a small blending brush to get rid of any harsh lines. If you want to be simpler, use an eyeliner pencil on your lower lash line. Then, smudge it using a smudge brush.
9. Highlight
You do not need a special shade of eye shadow to add some pop to your eyes. For this step, you can use your regular highlighter. Using your pencil brush, pick up some of the pigment and place it under the arch of your brow bone and the inner corner of your eyes. Doing this will not only make your eyes pop but will make them look bigger and less tired. Blend out any harsh edges to soften them up.
10. Finishing Touches
Finish your eye makeup look by adding some eyeliner and mascara. For a simple look, line your eyes as close to your lash line as possible. If you want a more dramatic look, try eyeliner wings to make your eyes look more elongated and sultry. Finally, apply mascara as the last step to complete your eye makeup; alternatively, you can go for false lashes. Play around with your makeup to get a feel for the products – how to apply them, and how they would look on your skin. The more familiar you are with them, the easier it will be to create different looks. And who knows – you might even discover a new favorite product!
Once you know the basics of makeup, you will be able to build on it to create more dramatic looks suited for special occasions or nights out. Dab on a shimmery shade of eyeshadow and apply liquid eyeliner to frame those gorgeous eyes and turn your everyday makeup into a bolder, sultrier night look.
If you have always been nervous about trying different makeup looks on your eyes, don’t be! With the simple tricks mentioned above, you will get flawless eye makeup every time.